9:00 AM

By
Unknown
 BedRug
,
F150,
SEMA 2015


 When discussing the build, we wanted to add some contrast. However, we definitely wanted to keep true to the Ford styling. The decision was made that we would use the wrap to contrast the body lines of the tailgate, much similar to how the Platinum F150's are. First we removed the factory Ford Emblem to ensure proper coverage. We then laid down some cut wire. We made sure the cutting tape was straight, and followed the lines perfectly. We then applied the wrap, overlapping the cut tape. Using the tap for its intentions, we then pulled the tape, cutting the wrap in the exact location we wanted it to look. The final result was a perfect contrast of silver and charcoal.
Read more
When discussing the build, we wanted to add some contrast. However, we definitely wanted to keep true to the Ford styling. The decision was made that we would use the wrap to contrast the body lines of the tailgate, much similar to how the Platinum F150's are. First we removed the factory Ford Emblem to ensure proper coverage. We then laid down some cut wire. We made sure the cutting tape was straight, and followed the lines perfectly. We then applied the wrap, overlapping the cut tape. Using the tap for its intentions, we then pulled the tape, cutting the wrap in the exact location we wanted it to look. The final result was a perfect contrast of silver and charcoal.
Read more
9:00 AM
By
Unknown
BedRug,
F150,
SEMA 2015
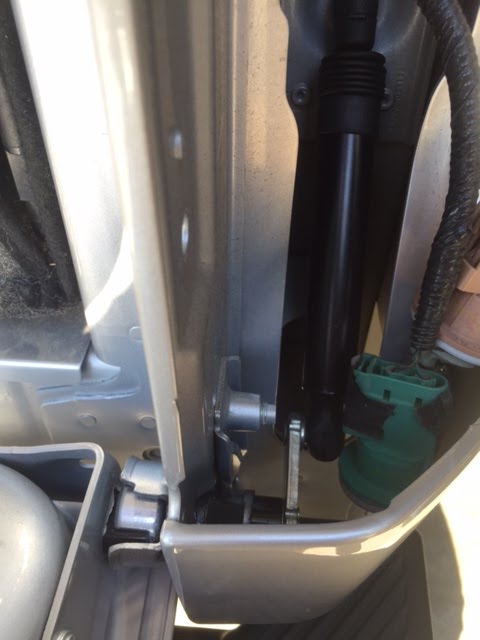
 One of the better innovations has been the tailgate shock. This, of course, prevents the tailgate from slamming when it's opened. I can only assumed Ford added this feature since they added the remote tailgate actuator. This is the option where the tailgate is "popped" open with the factory key fob. BedRug's XLT model did not come with this option, and therefore did not have the dampener. BUT...lucky for you, Ford sells this part on its own! It's Ford part# FL3Z-99406A10 and retails for $75.
Installation was very simple. Remove the two bolt screws holding the passenger side tail light in place. Once the bolt screws are removed, pull towards the back of the vehicle to remove the tail light. One you remove it, you will see the "ball" already welded onto the bed where the top of the shock mounts. Remove the tailgate. The aluminum tailgate makes it relatively easy with one person, but you may ask for assistance so that you don't accidentally bumper or scratch it. Remove the current tailgate support and replace it with the new part. That's pretty much it.
Simple upgrade. Relatively inexpensive. Under 30 minutes to install.
Read more
9:00 AM
By
Unknown
BedRug,
F150,
SEMA 2015,
Sony
Sony released a new series - the GS line. Sony hasn't really be a front runner in the audio world. So, curious on their performance, we installed these with enthusiasm. After pulling the front door panels, we noticed the OE speakers were built into the mounts. So as any shop would do, we made new mounting plates. This allowed us to mount the tweeter and crossover close together. Nothing elaborate, but worked great.

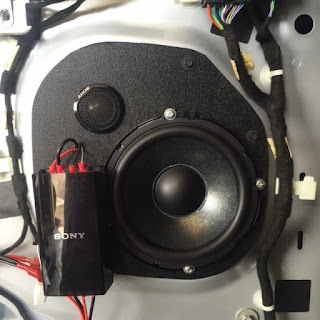
After firing these puppies up, let me tell you... It was definitely an improvement over stock, and it wasn't even amplified. Not only that, but Sony bumped up their warranty on these speakers to 3 years! Thank you, Sony. We are excited to see how the GS line will continue to develop over the years.
Read more
 Roadwire has always been a long supporter of our builds. They make some quality products and really push the envelope. They're forward thinking, and we've always appreciated have them on board.
We've finally completed the leather kit, and it is top notch. I don't say this because they support us. I say this because we don't just partner with just any brand. We look for quality. The leather is always a tight fit. I'm talking it's a work out just to put the kit on. Why? Because a kit should properly hug the cushion so that it doesn't slide around when you're sitting on it.

This would be our first experience with a Roadwire kit with the double diamond stitching. We've done other brands before, but not Roadwire since its relatively new with them. After sitting in it, it exceeded our expectations. The feel of sitting in it was just awesome. The additional cushioning from the double stitching was just a much better feel than the competitors. And aesthetically, it was just a beauty. All I wish is a perforated double diamond stitch would work with cooled seats. Until then....I'll take these all day.
Read more
For starters, we've installed several overlay grilles, replacement grilles, and cutout grilles. By the looks of it, it appears this is a cutout. That's not the case. The grill was real easy to install.
The 2015 Grilles are a 2 piece construction. The grille that is visible is actually an outer shell. The inner component has fins and motor, and is what physically attaches to the truck. The grill attaches to this piece.
To install, remove all the plastic push tabs from the cover. Near the latch release, you'll see 2 plugs. Undo those and using a panel popper, pull up the push pin that holds the wires/plugs onto the top. There you'll remove the 4 bolts that hold the top of the grille in. There will also be 2 bolts on each side about 3/4 down. Since we already had the headlights out, this was super easy. I'm not sure if you'll need to have the headlights removed to gain access to these bolts. If you do, you'll spend more time removing and reinstalling, then you will actually swapping the grilles out.
Once removed, look at the inside of the grille. You'll find all the nuts that need to be removed to detach the grille from the assembly. When done, just reverse the process. I'm sorry we didn't take pics during this process, but T-Rex does provide a nice instruction booklet to go with it.
Read more
 For this build, Skyjacker sent their 6" lift in silver powdercoat and King Shocks sent their blue anodized reservoir shocks. Since we would be utilizing some of the same bolt locations, we went ahead and installed the nFab Radius bumper while doing the lift.
The lift was first laid out and inventoried. Design and presentation was beautiful on by all parties. The powdercoat was nice on the lift. The anodized blue on the shocks were beautiful. We couldn't wait to dig in and start putting the lift on.
For the curious minds, we did notice a few differences on the 2015 model vehicles. On previous models, the lower control arm were assymetrical. (Typically one side was thinner than the other.) The 2015 models are the same on both sides. We also noticed that the axle nut in the center of the hub is also larger. Not sure why the design changes with Ford, but those are two things we noticed.

Nitto sent 35x12.50 20 Trail Grapplers to wrap around the 20" BMF BATL wheels. I admit, I wasn't too sure on the wheels at first. Seeing them in person is a whole different thing.
To help with braking, Powerstop sent rotors and pads. Pretty cool setup, if you ask me.
After getting all the components on, we moved onto the nFab Radius bumper. If you're looking to install one, there is a little bit of work involved. As simple as it seems, the bumper and shock reservoirs utilize the same bolts and location. So having to align 3 parts into a frame hole and onto a nut was a challenge. Also, the way it was designed, a secondary mount for the nFab bars, require being mounted to the OEM cross member. So if you're looking to do the same setup, make sure that the lift isn't installed prior to installing the new crossmember. After it's all said and done, it's definitely a beautiful combo.
Read more


 We kind of went back and forth with this design. Do we do a classic Boss design? Do we do a simple stripe on the side of the bed? Do we do mud splatters? What "look" were we going for? It was decided that we would keep the classic theme and continue to stay true to the Ford styling. However, no one made a "truck" model of this decal. We started to design it on our plotter, but our vinyl cutter started going wild. It wouldn't cut out the design. We have had troubles with our plotter already, and we finally decided that purchasing a new one would best suit us. Even after it arrived, we had driver issues that delayed cutting the decal with a plotter. So we then had to measure and do it all by hand.


 Read more